
- Jun 12, 2014
- 12,920
- 32,558
Founding Member
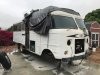
I have an old 1969 Chinook Mobile Lodge motorhome on a Dodge M300 chassis that I bought like a dumbass several years ago with the hopes of restoring this thing into something fun to take on short trips, tailgates, etc. Been working on it in stops and starts since then...sometimes I'll work on it every day for a week, then it'll sit for months before I touch anything else. What I keep getting into is this cycle where I take something apart, then realize if I don't fix it now its gonna be a major redass to come back and do it later, so the project keeps getting more involved and the pit keeps getting deeper! Oh well its fun and I don't have anything better to do right now.
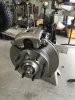
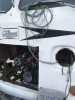
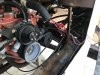
This thing was coughing and sputtering and the brakes barely worked when I drove it home. Pulled the engine out of the front hole and even taking it almost down to just a long block I barely fit it out the hole. Anyway rather than rebuild the old 318 which didn't even have adjustable valves I found a 360 at a junkyard and had that rebuilt instead. Other than massaging the motor mounts a little bit it fits right in. I had the Torqueflite transmission rebuilt as well....I don't know if it needed a rebuild but its a perfect example of one of those things I'd just as soon get handled while everything is apart. There was no way the new motor was going back into place through that front hole so I raise the vehicle as high as I could get it, pulled the whole front axle off, and raised the motor up into place from underneath.
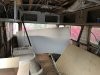
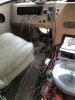
Meanwhile while all that was going on I pulled all the cabinets out except for the fiberglass head/shower cassette which was way too much of a PITA to mess with. Pulled all the paneling off and exposed the wood studs between the paneling and the aluminum siding. Quite a bit of wood rot but not terrible. The studs are a weird size so I had to rip lumber to match on my table saw and use all kinds of brackets etc to rebuild the structure as best I could. There are a few more spots to do but overall its gonna be ok. I plan to use some of that wood epoxy on small spots that aren't worth tearing out or are too hard to get at, I've heard that stuff makes the wood better than when it was new...we'll see. I pulled up every inch of floor and replaced with new plywood with new insulation underneath.
I have all the components for rebuilding the inside other than the cabinets which I'll have to make. I pulled out the full size fridge and am replacing with a dorm style fridge. I added a window where the fridge used to be and there will be more counter space now. Got a new water tank, pump, filter, accumulator, water heater....basically new everything. I pulled the massive gas furnace out...it took up a ton of room. We'll just use a portable heater in the winter.
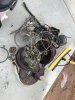
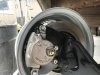
Biggest PITA of this whole thing has been the brakes, but even that drama starts with the wheels believe it or not. This thing came with the old 'widowmaker' split rims, the kind where you install a locking ring and use an inner tube and have to inflate the thing in a cage or take a chance of getting your head taken off. Nobody will touch those rims any more and unfortunately they had this retarded giant 6 lug pattern that simply doesn't exist any more, so there are no modern one piece wheels for this thing. So I decided to convert it to a standard 8 lug setup and put disc brakes on the front. Eventually I was able figure out that I could mount the front hub from a 92 Chevy van on the spindles that this thing has, and then bolt some adapters to the spindles to handle the dually wheels. I was able to find some laser cut brake caliper brackets that I cut up a little and was able to bolt to the backside of the steering knuckle. The next thing was this crazy hydraulic system they used back then was way too old and crusty and rebuilding it was going to be a nonstarter, so I scrapped all of that and bought a modern vacuum booster and master cylinder. There was no way to mount this stuff near the brake pedal where you would normally think it should go so I had to put it on the frame rail in front of the passenger front tire. I mounted a small clutch type master cylinder to the brake pedal, and used a slave cylinder at the other side to actuate the brake booster. Plumbed it all up with a proportioning valve for disc/drum setups and it should be hunky dory.
Last couple of days I've been wiring everything up. The original wiring harness was a rats nest that had been cut, spliced, rerouted all over, bypassed, etc. So I pulled it all out of the vehicle and got an entire new harness from Painless. Not something I'd ever put in a race car, but for something like this I can't say enough good things about it. All the wires are bundled for where they need to go, and every individual wire is labeled every foot or so with its wire number, major section, and specific purpose. Outstanding. The only thing you have to do is lay it all out and maybe pull a wire or two from one section to another depending on the layout of your specific vehicle. For example you might have the reverse light switch mounted on the shifter in which case that wire goes into the cockpit, or you might have that switch on the trans in which case that wire gets pulled over to the engine section. Super easy so far.
Hopefully I'll have all the engine electrical done in a day or so, then just a few more small chores and time to fire this baby up. Once I get it driveable again it should make working on it a ton easier because right now all the work has to happen outside on my concrete pad and it gets hot out there, especially inside the rig. Then I gotta make sure all the 110v household electrical is all functioning properly then I'll most likely take it to a cabinet guy to build out the bulk of the inside structure before bringing it home to finish ourselves with paint, flooring, etc.
This thing was coughing and sputtering and the brakes barely worked when I drove it home. Pulled the engine out of the front hole and even taking it almost down to just a long block I barely fit it out the hole. Anyway rather than rebuild the old 318 which didn't even have adjustable valves I found a 360 at a junkyard and had that rebuilt instead. Other than massaging the motor mounts a little bit it fits right in. I had the Torqueflite transmission rebuilt as well....I don't know if it needed a rebuild but its a perfect example of one of those things I'd just as soon get handled while everything is apart. There was no way the new motor was going back into place through that front hole so I raise the vehicle as high as I could get it, pulled the whole front axle off, and raised the motor up into place from underneath.
Meanwhile while all that was going on I pulled all the cabinets out except for the fiberglass head/shower cassette which was way too much of a PITA to mess with. Pulled all the paneling off and exposed the wood studs between the paneling and the aluminum siding. Quite a bit of wood rot but not terrible. The studs are a weird size so I had to rip lumber to match on my table saw and use all kinds of brackets etc to rebuild the structure as best I could. There are a few more spots to do but overall its gonna be ok. I plan to use some of that wood epoxy on small spots that aren't worth tearing out or are too hard to get at, I've heard that stuff makes the wood better than when it was new...we'll see. I pulled up every inch of floor and replaced with new plywood with new insulation underneath.
I have all the components for rebuilding the inside other than the cabinets which I'll have to make. I pulled out the full size fridge and am replacing with a dorm style fridge. I added a window where the fridge used to be and there will be more counter space now. Got a new water tank, pump, filter, accumulator, water heater....basically new everything. I pulled the massive gas furnace out...it took up a ton of room. We'll just use a portable heater in the winter.
Biggest PITA of this whole thing has been the brakes, but even that drama starts with the wheels believe it or not. This thing came with the old 'widowmaker' split rims, the kind where you install a locking ring and use an inner tube and have to inflate the thing in a cage or take a chance of getting your head taken off. Nobody will touch those rims any more and unfortunately they had this retarded giant 6 lug pattern that simply doesn't exist any more, so there are no modern one piece wheels for this thing. So I decided to convert it to a standard 8 lug setup and put disc brakes on the front. Eventually I was able figure out that I could mount the front hub from a 92 Chevy van on the spindles that this thing has, and then bolt some adapters to the spindles to handle the dually wheels. I was able to find some laser cut brake caliper brackets that I cut up a little and was able to bolt to the backside of the steering knuckle. The next thing was this crazy hydraulic system they used back then was way too old and crusty and rebuilding it was going to be a nonstarter, so I scrapped all of that and bought a modern vacuum booster and master cylinder. There was no way to mount this stuff near the brake pedal where you would normally think it should go so I had to put it on the frame rail in front of the passenger front tire. I mounted a small clutch type master cylinder to the brake pedal, and used a slave cylinder at the other side to actuate the brake booster. Plumbed it all up with a proportioning valve for disc/drum setups and it should be hunky dory.
Last couple of days I've been wiring everything up. The original wiring harness was a rats nest that had been cut, spliced, rerouted all over, bypassed, etc. So I pulled it all out of the vehicle and got an entire new harness from Painless. Not something I'd ever put in a race car, but for something like this I can't say enough good things about it. All the wires are bundled for where they need to go, and every individual wire is labeled every foot or so with its wire number, major section, and specific purpose. Outstanding. The only thing you have to do is lay it all out and maybe pull a wire or two from one section to another depending on the layout of your specific vehicle. For example you might have the reverse light switch mounted on the shifter in which case that wire goes into the cockpit, or you might have that switch on the trans in which case that wire gets pulled over to the engine section. Super easy so far.
Hopefully I'll have all the engine electrical done in a day or so, then just a few more small chores and time to fire this baby up. Once I get it driveable again it should make working on it a ton easier because right now all the work has to happen outside on my concrete pad and it gets hot out there, especially inside the rig. Then I gotta make sure all the 110v household electrical is all functioning properly then I'll most likely take it to a cabinet guy to build out the bulk of the inside structure before bringing it home to finish ourselves with paint, flooring, etc.
Attachments
-
 IMG_5884.JPG185.1 KB · Views: 324
 -
 IMG_5885.JPG162.7 KB · Views: 155
 -
 IMG_5881.JPG263.5 KB · Views: 164
 -
 IMG_5429.JPG196.8 KB · Views: 134
 -
 IMG_5466.JPG176.8 KB · Views: 158
 -
 IMG_5878.JPG175.1 KB · Views: 170
 -
 IMG_5879.JPG219.3 KB · Views: 138
 -
 IMG_5880.JPG200.4 KB · Views: 142
 -
 IMG_C116A61F32C5-1.jpeg112.2 KB · Views: 152


/arc-anglerfish-tgam-prod-tgam.s3.amazonaws.com/public/GGVOSDN4TVE4PPQZ6UCTB5XPH4)